简单2D游戏角色控制器的实现
学习自 Matthew-J-Spencer 的 Ultimate 2D Controller
链接: Ultimate 2D Controller
需求
碰撞检测 ✔
左右横向移动 ✔
跳跃
下落/重力 ✔
容错机制
Dash 冲刺
在Matthew-J-Spencer的最初版本代码中,仅完成了✔的部分功能。我会在后续尝试将其他功能补齐。
流程
代码 1 2 3 4 5 6 7 8 9 10 11 12 13 14 15 private void Update ( GatherInput(); RunCollisionChecks(); CalculateWalk(); CalculateJumpApex(); CalculateGravity(); CalculateJump(); MoveCharacter(); }
获取输入 在Player中包含有一个FrameInput类型的属性Input,用于记录当前帧接收到的输入情况。
代码 1 2 3 4 5 6 7 public struct FrameInput{ public float X; public float Y; public bool JumpDown; public bool JumpUp; }
这里并没用到Y,在后续添加向各个方向Dash的功能时,就要用到Y啦,不过目前我们还没做Dash功能。
1 2 3 4 5 6 7 8 9 10 11 12 13 14 15 16 private void GatherInput ( Input = new FrameInput { JumpDown = UnityEngine.Input.GetButtonDown("Jump" ), JumpUp = UnityEngine.Input.GetButtonUp("Jump" ), X = UnityEngine.Input.GetAxisRaw("Horizontal" ) }; if (Input.JumpDown) { _lastJumpPressed = Time.time; } }
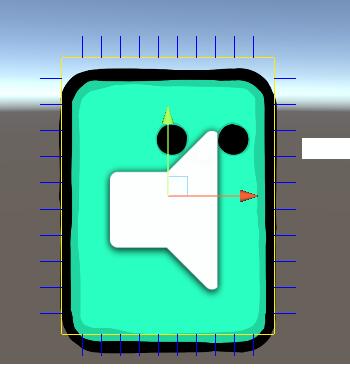
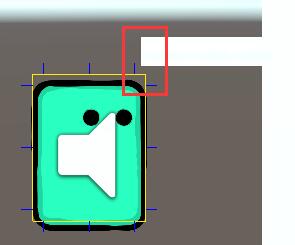
碰撞检测 碰撞检测依靠向上下左右四个方向分别发射若干条射线,进行射线检测实现的。
Player自身无需Rigidbody2D或者Collider2D, 地板、墙、平台等,须包含Collider2D组件,同时设定好Layer。
射线检测 如下图,我们在Player的四个方向,分别发射了3条射线(图中蓝色短线),并且我们维护四个bool类型的变量_colUp,_colRight,_colDown,_colLeft用来表示在四个方向上是否有发生碰撞。
在这个过程中,最重要的当属更新_colDown了,因为他于我们的跳跃功能息息相关。这里有两个特殊情况需要我们处理一下:
_colDown为true,但当前帧向下的射线检测值为false,说明这是我们起跳或者离开平台边缘的第一帧
_colDown为false,但是当前帧向下的射线检测值为true,说明这是我们落到地上的第一帧
对于情况2,我们要将Player的LandingThisFrame属性设为true,以表示已经落地,从而使得Player可以再次起跳。
对于情况1,我们要用_timeLeftGrounded记录当前的时间,这是为了实现“可以在离开边缘短时间内起跳”这一容错机制,具体实现细节在跳跃/下降与重力 小结讲。
代码 1 2 3 4 5 6 7 8 9 10 11 12 13 14 15 16 17 18 19 20 21 22 23 24 25 26 27 28 29 30 31 32 33 34 35 36 37 38 39 40 41 42 43 44 45 46 47 48 49 50 51 52 53 54 55 56 57 58 59 60 61 62 63 64 65 66 67 68 69 70 71 72 73 74 75 76 77 78 79 80 [Header("COLLISION" ) ] [SerializeField, Tooltip("角色的碰撞检测盒" ) ] private Bounds _characterBounds;[SerializeField, Tooltip("射线检测的Layer" ) ] private LayerMask _groundLayer;[SerializeField, Tooltip("每个方向发射的射线数量" ) ] private int _detectorCount = 3 ;[SerializeField, Tooltip("射线检测距离" ) ] private float _detectionRayLength = 0.1f ;[SerializeField, Tooltip("发射线区域与边缘的缓冲区大小" ) ] [Range(0.1f, 0.3f) ] private float _rayBuffer = 0.1f ; private RayRange _raysUp, _raysRight, _raysDown, _raysLeft; private bool _colUp, _colRight, _colDown, _colLeft; private float _timeLeftGrounded; private void RunCollisionChecks ( CalculateRayRanged(); LandingThisFrame = false ; var groundedCheck = RunDetection(_raysDown); if (_colDown && !groundedCheck) _timeLeftGrounded = Time.time; else if (!_colDown && groundedCheck) { _coyoteUsable = true ; LandingThisFrame = true ; } _colDown = groundedCheck; _colUp = RunDetection(_raysUp); _colLeft = RunDetection(_raysLeft); _colRight = RunDetection(_raysRight); bool RunDetection (RayRange range ) return EvaluateRayPositions(range).Any(point => Physics2D.Raycast(point, range.Dir, _detectionRayLength, _groundLayer)); } } private void CalculateRayRanged ( var b = new Bounds(transform.position, _characterBounds.size); _raysDown = new RayRange(b.min.x + _rayBuffer, b.min.y, b.max.x - _rayBuffer, b.min.y, Vector2.down); _raysUp = new RayRange(b.min.x + _rayBuffer, b.max.y, b.max.x - _rayBuffer, b.max.y, Vector2.up); _raysLeft = new RayRange(b.min.x, b.min.y + _rayBuffer, b.min.x, b.max.y - _rayBuffer, Vector2.left); _raysRight = new RayRange(b.max.x, b.min.y + _rayBuffer, b.max.x, b.max.y - _rayBuffer, Vector2.right); } private IEnumerable<Vector2> EvaluateRayPositions (RayRange range ) for (var i = 0 ; i < _detectorCount; i++) { var t = (float )i / (_detectorCount - 1 ); yield return Vector2.Lerp(range.Start, range.End, t); } }
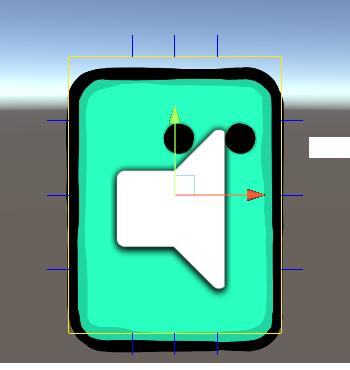
各参数效果展示 在上文 发射射线示意图 中,_characterBounds的Extend属性的值为{x = 0.5, y = 0.65, z = 0.0},_detectorCount为3,_rayBuffer为0.1,_detectionRayLength为0.1。
当_characterBounds的Extend属性的值为{x = 0.65, y = 0.25, z = 0.0}时,效果如下
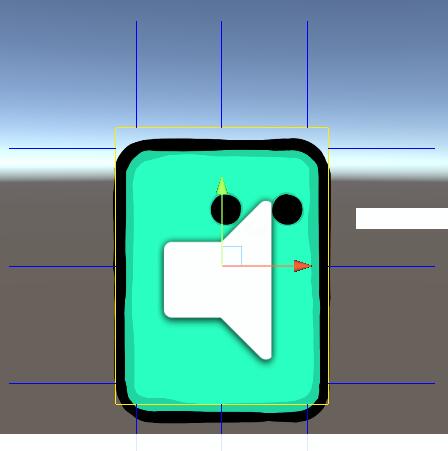
当_detectorCount为10时,效果如下
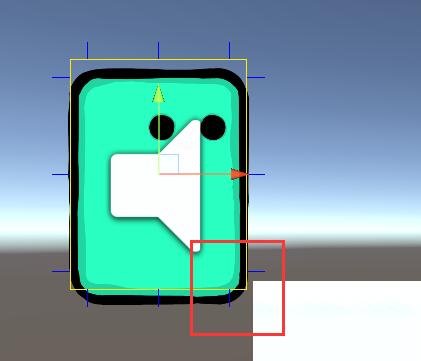
当_rayBuffer为0.3时,效果如下
当_detectionRayLength为0.5时,效果如下
水平移动 所有的移动处理(包括后面的跳跃,重力下坠),均仅对Player的_currentHorizontalSpeed,_currentVerticalSpeed属性进行修改,在每帧的最后一步去根据Player的水平/垂直速度,修改transform.position。
为了优化手感,我们在跳跃过程中,会小幅增加水平移动的最大速度,并且越接近跳跃最高点,增幅越大。具体思路在跳跃/下降与重力 中详细讲。
代码 1 2 3 4 5 6 7 8 9 10 11 12 13 14 15 16 17 18 19 20 21 22 23 24 25 26 27 28 29 30 31 32 33 34 35 36 37 38 39 40 41 42 43 44 45 [Header("WALKING" ) ] [SerializeField, Tooltip("加速度" ) ] private float _acceleration = 90 ;[SerializeField, Tooltip("最大移动速度" ) ] private float _moveClamp = 13 ;[SerializeField, Tooltip("减速度" ) ] private float _deAcceleration = 60f ;[SerializeField, Tooltip("在跳跃中对移速的加成系数" ) ] private float _apexBonus = 2 ;private void CalculateWalk ( if (Input.X != 0 ) { _currentHorizontalSpeed += Input.X * _acceleration * Time.deltaTime; _currentHorizontalSpeed = Mathf.Clamp(_currentHorizontalSpeed, -_moveClamp, _moveClamp); var apexBonus = Mathf.Sign(Input.X) * _apexBonus * _apexPoint; _currentHorizontalSpeed += apexBonus * Time.deltaTime; } else { _currentHorizontalSpeed = Mathf.MoveTowards(_currentHorizontalSpeed, 0 , _deAcceleration * Time.deltaTime); } if (_currentHorizontalSpeed > 0 && _colRight || _currentHorizontalSpeed < 0 && _colLeft) { _currentHorizontalSpeed = 0 ; } }
跳跃/下降与重力 首先在这里我们手动模拟了一个重力系统。为了让游戏操作“手感更好”,我们并没有按照真实的物理规律去实现重力,而是做了一些改动:
同时在跳跃时,我们做了以下几点:
中断跳跃(即在跳跃上升中如果松开空格,则会即刻开始下落)
可以在离开边缘短时间内起跳_timeLeftGrounded来实现的,只要当前时间减去_timeLeftGrounded小于我们设定的阈值_coyoteTimeThreshold,即使现在我们已经走出了平台边缘(悬空了),我们仍可以跳跃。
在还没完全落地时,就可以按跳跃键连续跳跃了获取输入 中,只要跳跃键被按下,就用_lastJumpPressed参数不断记录当前时间,如果在落地前_jumpBuffer时间内按下过跳跃键(即_lastJumpPressed + _jumpBuffer > Time.time时),则会在落地后自动起跳,实现流畅的连续跳跃。
跳跃中给予水平移速加成_moveClamp,且越接近跳跃最高点,加成越高。这通过_jumpApexThreshold、_apexPoint和_apexBonus三个参数实现,其中_apexPoint = Mathf.InverseLerp(_jumpApexThreshold, 0, Mathf.Abs(Velocity.y));,速度加成为Mathf.Sign(Input.X) * _apexBonus * _apexPoint。
代码 1 2 3 4 5 6 7 8 9 10 11 12 13 14 15 16 17 18 19 20 21 22 23 24 25 26 27 28 29 30 31 32 33 34 35 [Header("GRAVITY" ) ] [SerializeField, Tooltip("最大下落速度" ) ] private float _fallClamp = -40f ;[SerializeField, Tooltip("最小下落加速度" ) ] private float _minFallSpeed = 80f ;[SerializeField, Tooltip("最大下落加速度" ) ] private float _maxFallSpeed = 120f ;private float _fallSpeed; private void CalculateGravity ( if (_colDown) { if (_currentVerticalSpeed < 0 ) _currentVerticalSpeed = 0 ; } else { float fallSpeed = _endedJumpEarly && _currentVerticalSpeed > 0 ? _fallSpeed * _jumpEndEarlyGravityModifier : _fallSpeed; _currentVerticalSpeed -= fallSpeed * Time.deltaTime; if (_currentVerticalSpeed < _fallClamp) _currentVerticalSpeed = _fallClamp; } }
1 2 3 4 5 6 7 8 9 10 11 12 13 14 15 16 17 18 19 20 21 22 23 24 25 26 27 28 29 30 31 32 33 34 35 36 37 38 39 40 41 42 43 44 45 46 47 48 49 50 51 52 53 54 55 56 57 58 59 60 61 62 63 64 65 66 67 68 69 70 71 72 73 74 75 76 77 78 79 80 [Header("JUMPING" ) ] [SerializeField, Tooltip("跳跃初速度" ) ] private float _jumpHeight = 30 ;[SerializeField, Tooltip("当上升时速度小于该值时认为接近跳跃最高点了" ) ] private float _jumpApexThreshold = 10f ;[SerializeField, Tooltip("离开平台边缘仍可起跳的时间" ) ] private float _coyoteTimeThreshold = 0.1f ;[SerializeField, Tooltip("在离落地前多少时间内就可以响应跳跃按键" ) ] private float _jumpBuffer = 0.1f ;[SerializeField, Tooltip("中断跳跃时附加的乡下加速度倍数" ) ] private float _jumpEndEarlyGravityModifier = 3 ;private bool _coyoteUsable; private bool _endedJumpEarly = true ; private float _apexPoint; private float _lastJumpPressed; private bool CanUseCoyote => _coyoteUsable && !_colDown && _timeLeftGrounded + _coyoteTimeThreshold > Time.time;private bool HasBufferedJump => _colDown && _lastJumpPressed + _jumpBuffer > Time.time;private void CalculateJumpApex ( if (!_colDown) { _apexPoint = Mathf.InverseLerp(_jumpApexThreshold, 0 , Mathf.Abs(Velocity.y)); _fallSpeed = Mathf.Lerp(_minFallSpeed, _maxFallSpeed, _apexPoint); } else { _apexPoint = 0 ; } } private void CalculateJump ( if ((Input.JumpDown && CanUseCoyote) || HasBufferedJump) { _currentVerticalSpeed = _jumpHeight; _endedJumpEarly = false ; _coyoteUsable = false ; _timeLeftGrounded = float .MinValue; JumpingThisFrame = true ; } else { JumpingThisFrame = false ; } if (!_colDown && Input.JumpUp && !_endedJumpEarly && Velocity.y > 0 ) { _endedJumpEarly = true ; } if (_colUp) { if (_currentVerticalSpeed > 0 ) _currentVerticalSpeed = 0 ; } }
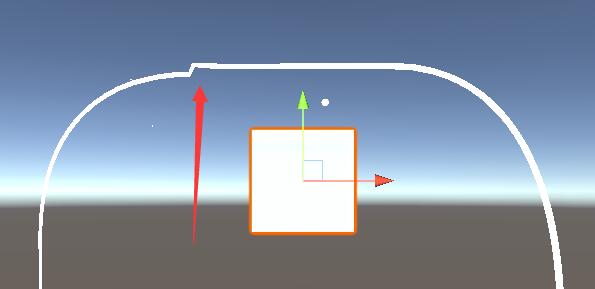
移动角色 移动Player时,我们根据Player当前的水平、垂直速度,计算出下一帧Player应处的位置,并依据_characterBounds的大小,在对应位置进行碰撞检测,如果此时并没有碰到任何物体,则直接把Player移动到对应位置即可。否则要根据_freeColliderIterations参数,一小步一小步试探。
例如_freeColliderIterations = 3,当前Player处于{x = 0, y = 0.5, z = 0}的位置,下一帧理论位置为{x = 1.2, y = 0.5, z = 0},而在这个位置的碰撞检测检测到了障碍物,则我们需要在{x = 0.4, y = 0.5, z = 0}位置进行碰撞检测,如果无障碍物,则将Player移动到该位置,并在{x = 0.8, y = 0.5, z = 0}位置再检测,以此类推。故而_freeColliderIterations越大,移动则会更精细,但是计算量也会同时提升很多。
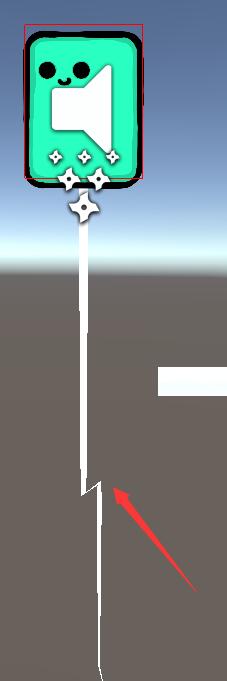
同时,在移动过程中,我们要完成一点容错处理:
起跳时碰到了一点点上平台的边缘,让用户不会被平台阻挡跳跃
这两点其实处理方法是一样的,首先在下一帧理论位置存在障碍物,且进行小步移动时,第一步就有障碍物,则触发这两种容错。我们仅需在此时将Player往碰撞点的反方向轻推一下即可。
效果:
这样处理大部分情况都没问题,不过还是有bug的,这一轻推可能会把Player推到墙里卡住,所以后续可以思考更好的解决方案。
代码 1 2 3 4 5 6 7 8 9 10 11 12 13 14 15 16 17 18 19 20 21 22 23 24 25 26 27 28 29 30 31 32 33 34 35 36 37 38 39 40 41 42 43 44 45 46 47 48 49 50 51 52 [Header("MOVE" ) ] [SerializeField, Tooltip("碰撞检测精度" ) ] private int _freeColliderIterations = 10 ;private void MoveCharacter ( Vector3 pos = transform.position; RawMovement = new Vector3(_currentHorizontalSpeed, _currentVerticalSpeed); Vector3 move = RawMovement * Time.deltaTime; Vector3 furthestPoint = pos + move; var hit = Physics2D.OverlapBox(furthestPoint, _characterBounds.size, 0 , _groundLayer); if (!hit) { transform.position += move; return ; } Vector3 positionToMoveTo = transform.position; for (int i = 1 ; i < _freeColliderIterations; i++) { float t = (float )i / _freeColliderIterations; Vector2 posToTry = Vector2.Lerp(pos, furthestPoint, t); if (Physics2D.OverlapBox(posToTry, _characterBounds.size, 0 , _groundLayer)) { transform.position = positionToMoveTo; if (i == 1 ) { if (_currentVerticalSpeed < 0 ) _currentVerticalSpeed = 0 ; Vector3 dir = transform.position - hit.transform.position; transform.position += dir.normalized * move.magnitude; } return ; } positionToMoveTo = posToTry; } }
完整代码 添加了中文注释的完整代码已上传至Github